Cyanview RCP
Intro
You can control our cameras simply using our free software
But if you need a RCP, we recommand Cyanview
Cyanview is a universal RCP, multi brand, multi model.
A single RCP can control up to 100 cameras (mixing models/brands).
Over various links:
- Ethernet
- Fiber
- RF
- 4G
They offer a normal model and a joystick version.
For our camera, we recommand the normal model as we don't have iris control. And you will have multiple camera on a single RCP, so the joystick version is not really ideal.
Both versions can be fitted in a desk to match a standard Sony RCP size.


Controls
| Proton cams | |
|---|---|
| White Balance (R/G/B and Color temp.) | ✔ |
| Exposure (Gain and Shutter) | ✔ |
| Master Black and Black Balance (R/G) | ✔ |
| Detail level and crispening | ✔ |
| User Matrix | ✔ |
| Multi Matrix | ✔ |
| Knee | ✔ |
| Saturation | ✔ |
| Master Gamma | ✔ |
| OETF (SDR/HLG/PQ/S-Log3) | ✔ |
| Color space (709, 2020) | ✔ |
| Formats (1080i 50/59/60, 1080p 23/24/25/29/30/50/59/60) | ✔ |
| AUTO (AWB, ATW, Gain, Shutter) | ✔ |
| RED tally | ✔ |
Here is a GIF showing all accessible menus:

Wiring
You have two ways to connect the camera to a cyanview RCP:
- using CI0 : easy, flexible/extendable, plug and play, IP, additional cost
- using PIO : easy, plug and play, USB/Serial, cheaper
- using PIO-E : easy, plug and play, PoE, cheaper/smaller than CI0
Rule of tumb is:
- chose CI0 if budget is not an issue
- chose CI0 if you're planning to control different cameras model/types
- chose CI0 if you already have Ethernet/Fiber
- chose PIO if you're OK with USB and extend the serial cable
- chose PIO if you already have serial/power link to your camera location
- chose PIO-E if you have PoE and want something small for your proton cam and cyanview workflow
RCP PIO E
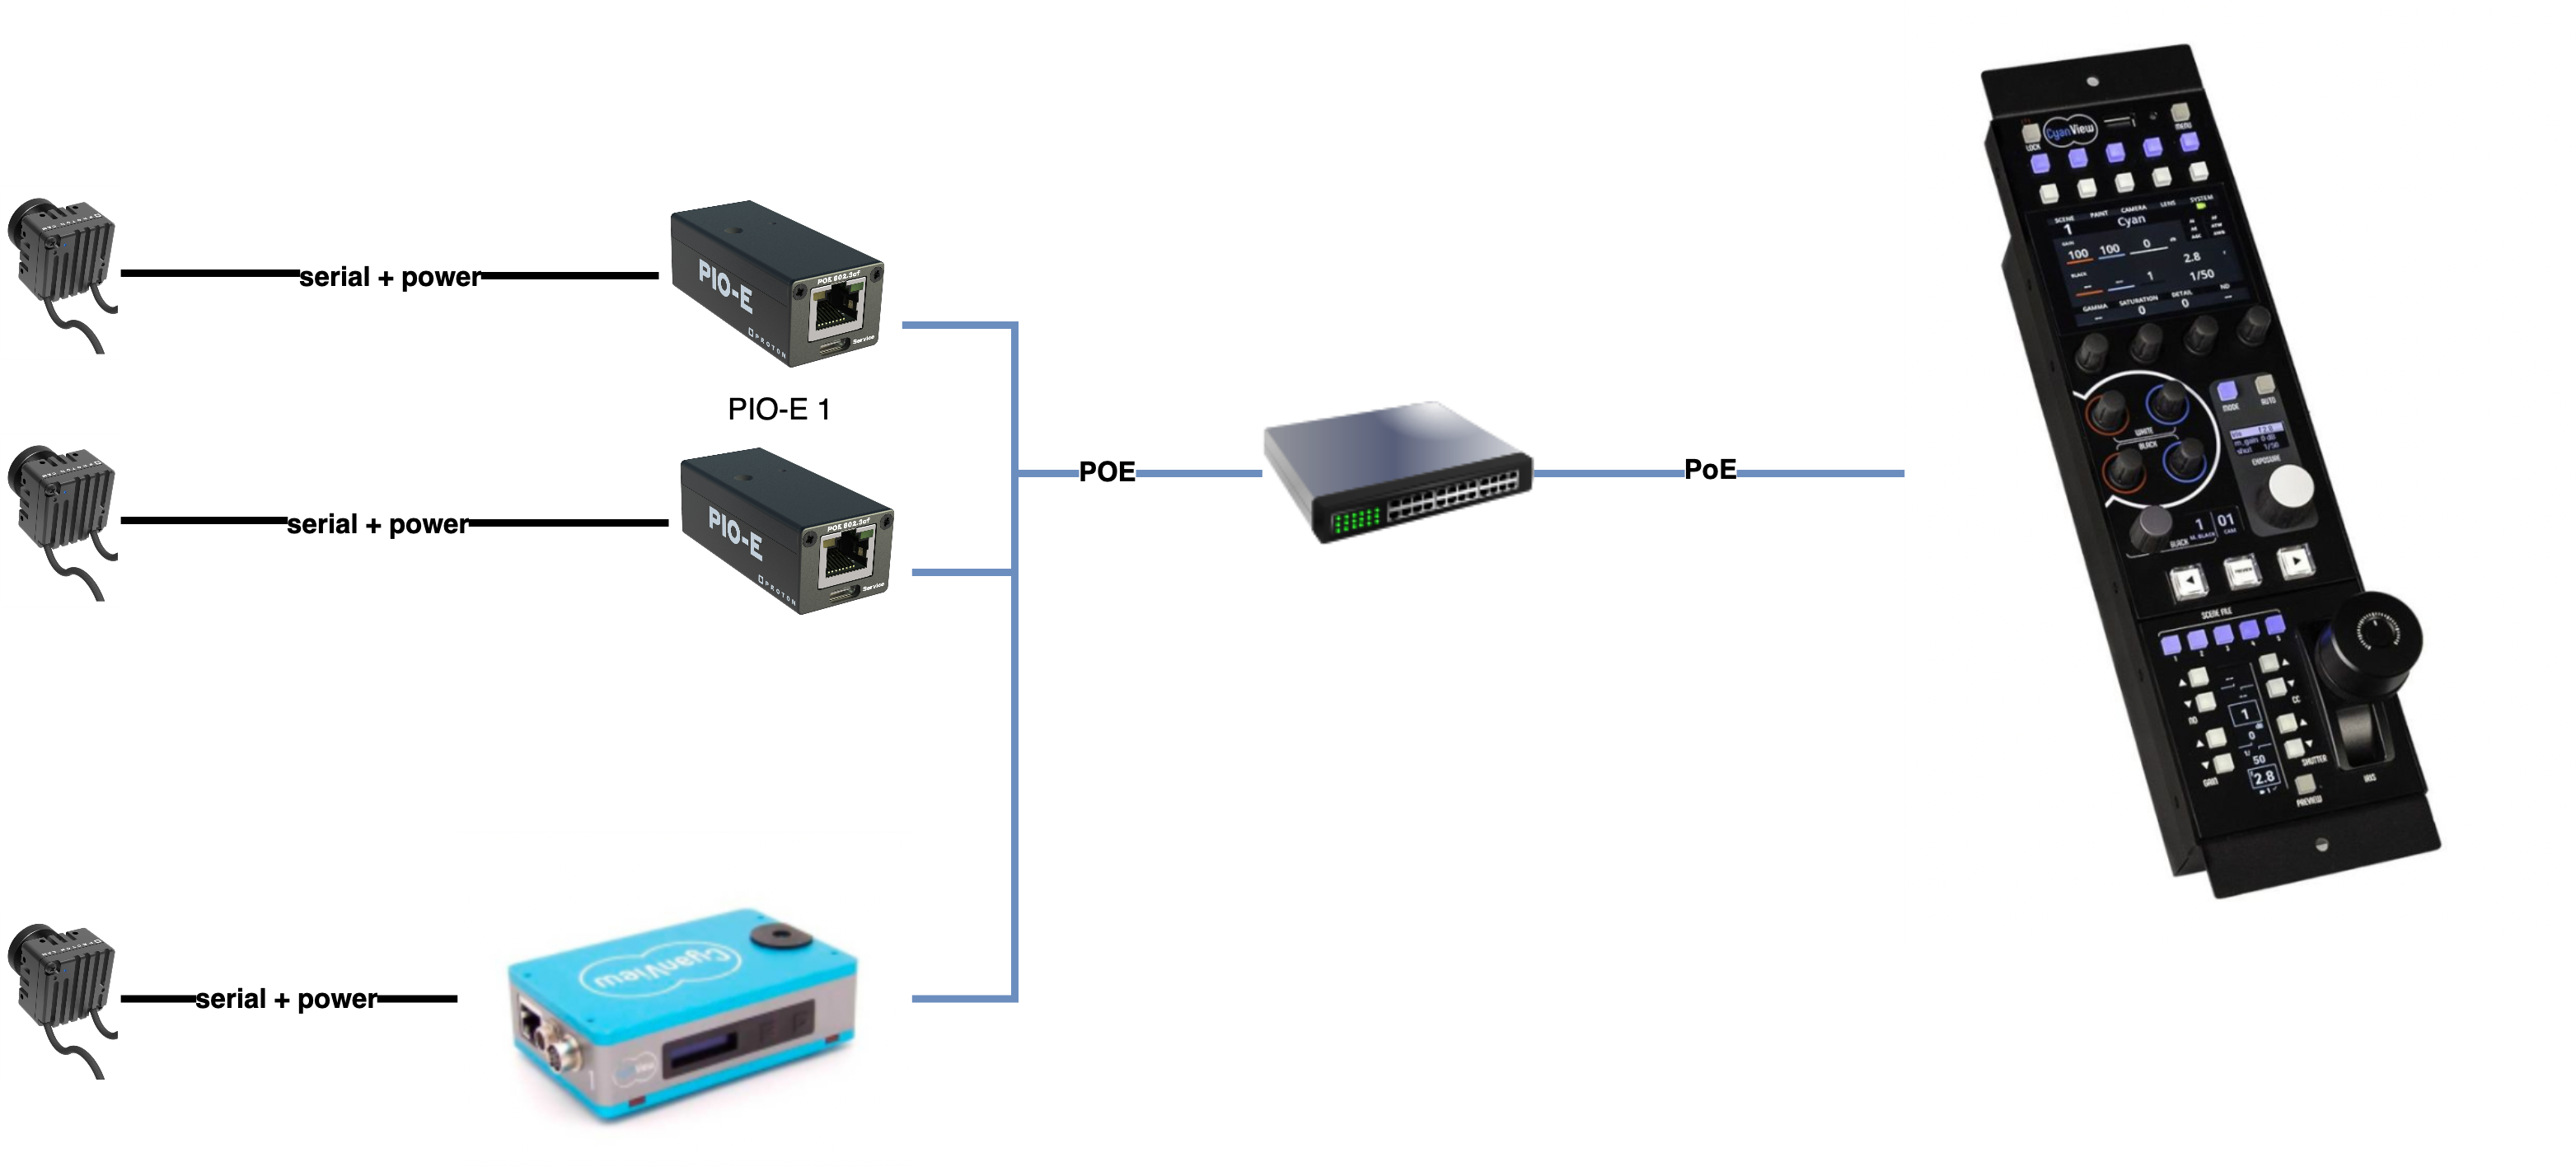
- Proton camera is plugged direclty on PIO-E
- The PIO-E provides: data + power to the camera (max 12V 1A 12W)
- The PIO-E is powered through PoE
- The RCP can be powered by PoE or 12V (PSU or D-Tap)
- The RCP and PIO-E communicate over Ethernet
RCP CI0

- Proton camera is plugged directly on CI0
- The CI0 provides: data + power to the camera
- The CI0 can be powered by PoE or 12V (PSU or D-Tap)
- The RCP can be powered by PoE or 12V (PSU or D-Tap)
- CI0 and RCP communicate over IP (including Ethernet, Fiber, etc.)
One CI0 has 2 serial port by default. So you can plug 2 cameras on a single CI0 with standard cables. You can even use a single CI0 port to control a camera "bus". In this case, each camera has it's own ID, and this will requires custom cables on your side.
RCP PIO

- Proton camera is plugged direclty on PIO
- The PIO provides: data + power to the camera
- The PIO can be powered by USB (requires stable 5V and 1A) or external 12V
- The RCP can be powered by PoE or 12V (PSU or D-Tap)
- The RCP and PIO communicate over USB
If you want to:
- plug multiple camera : you could use a powered USB HUB
- control camera further: you can extend the serial cable with straight 6P hirose
Setup
| RCP/CI0 | USB | |
|---|---|---|
| Setup |  |  |
| Status |  |  |
- Create a new camera by clicking on
+ - Enter a
Number(this will order the camera) - Enter a
Name(this will be visible in web UI and RCP) - In
Camera Headsection:- Select
Protonfor theBrand - Select
Proton CAMfor theModel(Proton CAM, Flex, Rain shares the same control) - Select the USB port or CI0 serial/port in
Interface: Port
- Select
After a couple of seconds (< 30s), it should turns green, meaning you have a bidirectional control.
Don't change anything else here:
- Resolution : changed using RCP itself
- Frequency : changed using RCP itself
- Lens : controlled through the camera itself
FAQ
How to change the format?
- Long press on RCP MENU
- Navigate using the touchscreen to
CAMERA > FORMAT - Turn the first knob to change the format
- Once selected, wait 3sec
- The camera will reboot in the selected format

You can chose between:
- 1080i50
- 1080i59
- 1080i60
- 1080p23
- 1080p24
- 1080p25
- 1080p29
- 1080p30
- 1080p50
- 1080p59
- 1080p60
How to flip horizontal or vertical
- Long press on RCP MENU
- Navigate using the touchscreen to
CAMERA > LENS - Navigate to
PTZF - Select the second tab:
Settings - You can flip horizontally by toggling
Horizontal - You can flip vertically by toggling
Vertical - They can be combined

My camera stays RED on the RCP
If you have one on hand, plug the camera on your computer using the PIO
You can try:
-
Unplug and replug the camera in the CI0
-
Check the CI0 power supply (PoE or PSU or D-TAP), display should be ON
-
Check in the RCP web UI, in diagnostic that the CI0 is visible in the list
-
Check in the RCP web UI, in diagnostic that the CI0 is associated with your RCP and not another one
-
Check on the CI0 if the display is ON:
- it should display
<-> - and your camera number (from the RCP config)
- in big/bold
- if it's something else (
X,<>,NO ETH,<->with small number), you have an issue
- it should display
-
Update the RCP to the latest version using a SWU
-
Update the Proton cam using the Proton Updater
-
Re do the configuration from scratch
-
This will ensure:
- the camera and the RCP are in sync
- the RCP is properly configured and no issue from previous tests
At the end, if everything went well:
- CI0 should display your camera number in bold/big
- RCP should display your camera in green (both on RCP and RCP web UI)
- You should have bidirectional control of the camera
Control a camera bus
Sometime you have a single CI0/RIO port and you need to control multiple cameras on it.
Proton cameras are identified by:
- unique camera ID (to control one camera at a time, individually)
- a group ID (to control a group of camera, applying the same settings to everybody, requires a unique "master" in the group/bus)
By default, when you configure your proton cam, cyanview use the id 100 which is our broadcast id. This works if you only have 1 camera per port.
The first step is to check (and change if needed your camera id and/or group using the proton control software):
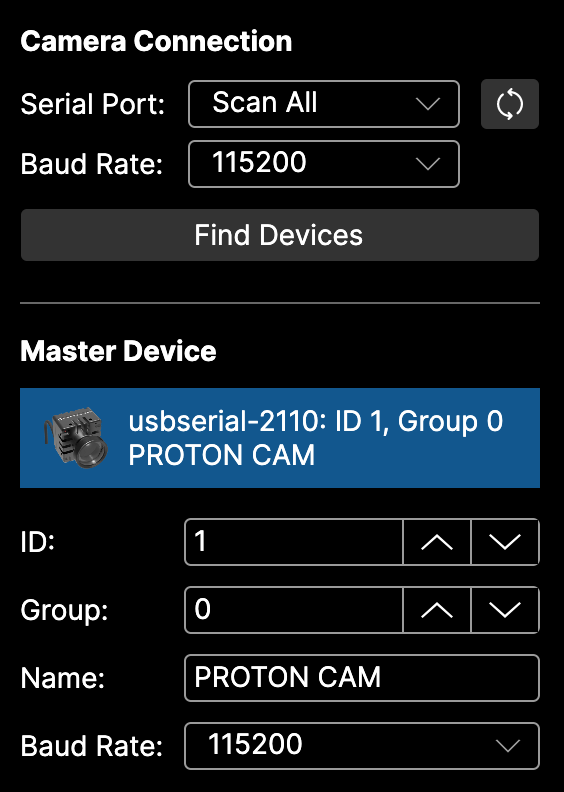
Here, my camera:
- cam ID 1
- group ID 0
- master of the group
In your cyanview RCP, create the bus:
- In the
web UI - In
Configurationtab - In
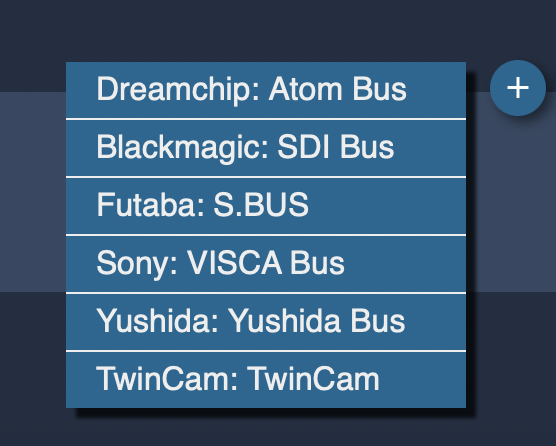
Featureblock - Click on
+and selectDreamchip bus
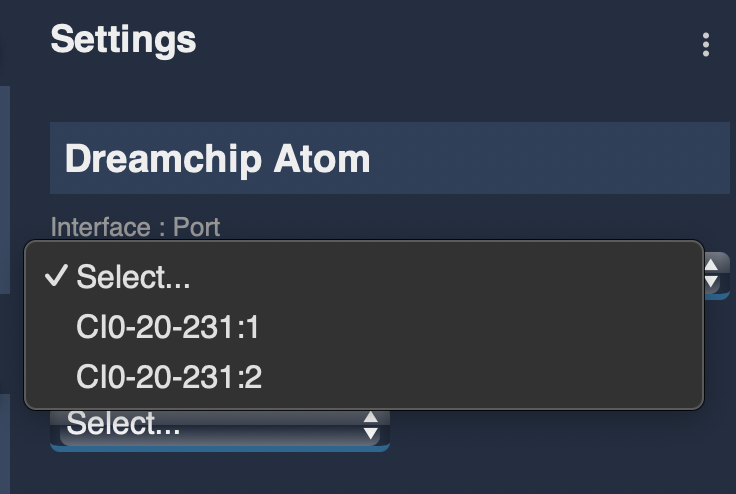
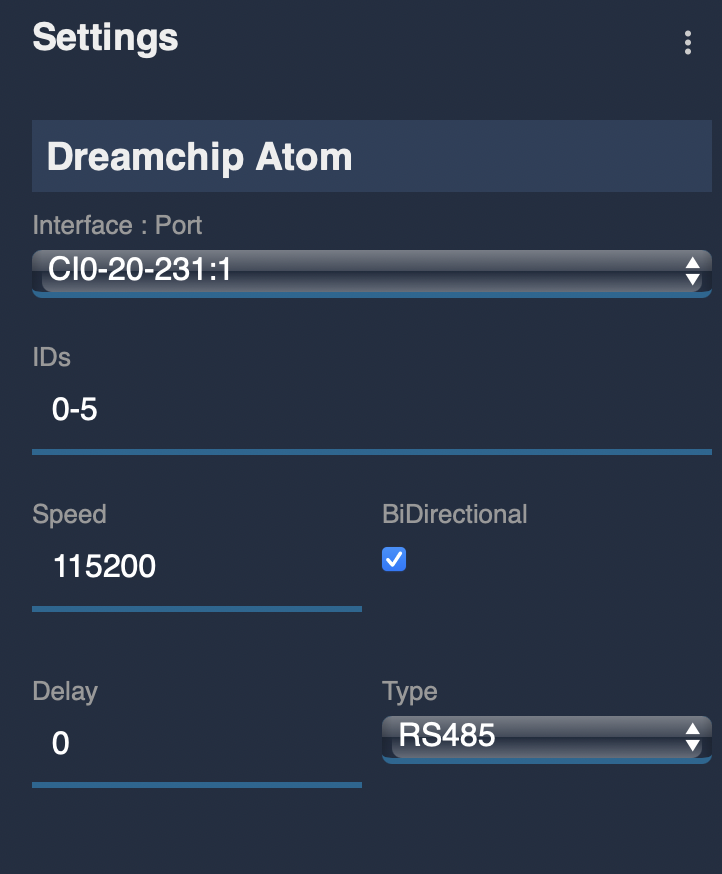
Then, you need to select on which CI0/port your bus is plugged in (in my case CI0-20-231, port 1) :
And configure the range of ID present on this bus (0-5 in my case):
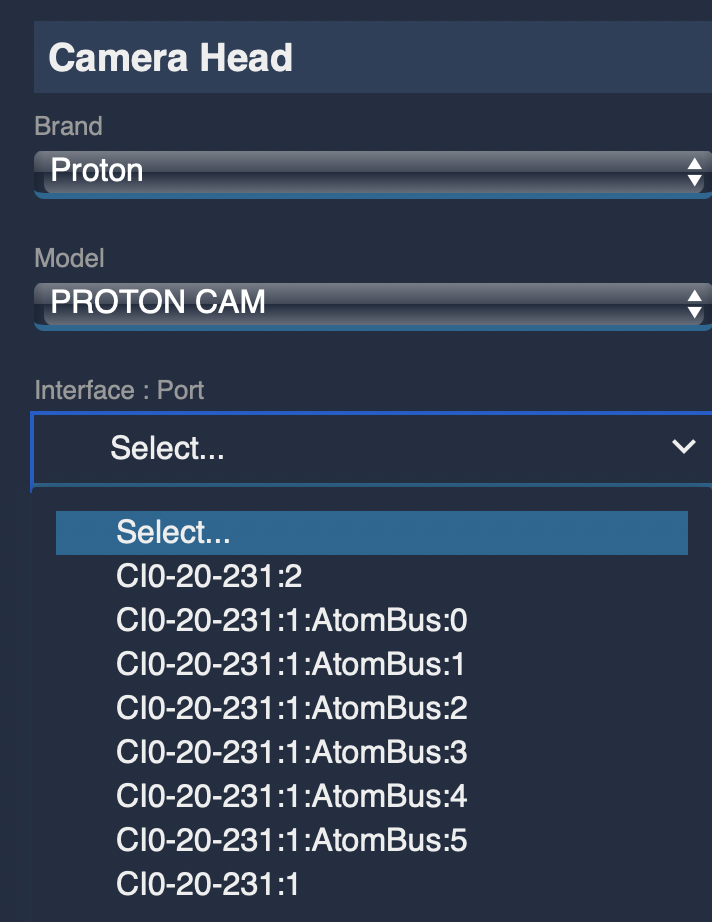
And now, you can configure your camera as usual, and instead of selecting the CI0/port as usual (which would use the broadcast id 100), you use your bus ID instead.
And if everything went well, it should turn green within 30s:
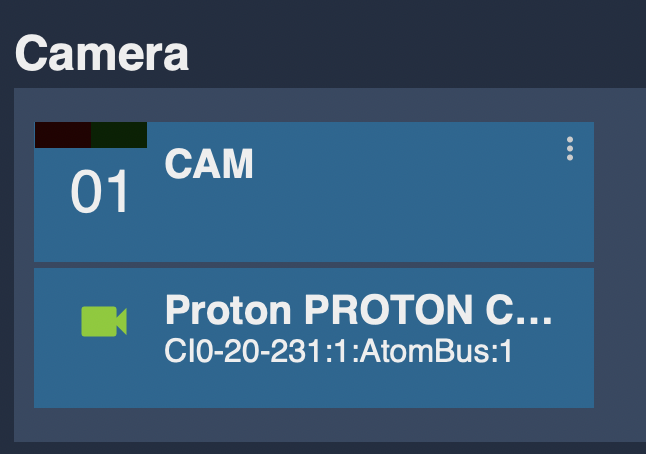
In this case, i'm controlling camera ID 1 on my bus. You could:
- Create other cameras, using the same bus, but different ID's.
- Have multiple bus on different CI0 ports (here i could have a bus on port 1 and another on port 2) or different CI0.
- Control a single camera (using the cam id,
1in my case), controlling multiple cameras (using the bus ID,0in my case).
Here, we're only explaining the setup. Pay attention to wiring, especially power:
- when using PoE, CI0 is regulating voltage at 12V, but is limited at 1A per port.
- when using external power supply, CI0 is not regulating voltage (so ensure it match both CI0 and camera range). But it allows you to then (with a proper power supply), have a camera drawing more than 12W.
You could also provide power to the camera bus yourself without using the CI0 power, just keeping CI0 for serial/telemetry/control.